Over the Salt

Mindful choices for healthy and low sodium cooking


Leave a comment

Basic Equipment

kitchenEquipmentContrary to popular belief, you dont need a cupboard full of electrical mixers, blenders, grinders or other gadgets to start you on your journey to having fun with cooking. They are nice to have but unless you use it all the time a gadget does not save time – it just takes up space.

Below is a list of what I think should be in every kitchen, and it is what I advised my daughter when she moved into her first apartment.

Starting with the utensil drawer

  • Vegetable Peeler
  • Teflon spatula (commonly known as an egg lifter)
  • Silicon scraper x 2
  • Bamboo or Wooden spoons x3
  • Metal tongs
  • Ladle
  • Slotted Spoon
  • Large serving spoon
  • Pastry brush
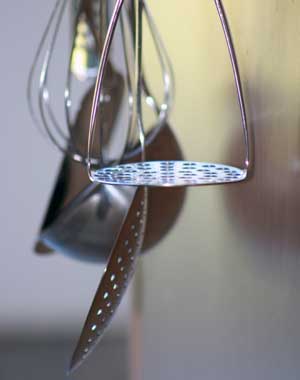
  • Potato masher
  • Balloon whisk

Moving onto the larger utensils

  • Colander
  • Cheese grater – these come in a bewildering range of sizes so choose a free standing grater for your first one and gradually add to this
  • Large and small strainers (preferably with metal mesh)
  • Good quality chopping boards – keep one separated for preparing fruit and vegetables a tip is to buy this in a different colour. Dont use glass boards- they ruin the knives’ edge
  • Set of small stackable bowls for preparation
  • At least 2 Mixing bowls – preferably glass or stainless steel; neither of which will react or absorb the flavours of the food you are preparing
  • 8″ Chef’s knife (I prefer Wusthof Trident but that is another matter)
  • 8 to 10″ Serrated Blade knife
  • at least 2 paring knives – these come in handy for most small preparation
  • Rolling pin
  • Set of measuring cups and spoons
  • Large pyrex measuring jug (dual measurments are great)
  • Disposable storage containers (I use these because I dont fret when the food stains them and I have to throw them out)

Now for the Big Stuff

A good set of saucepans should include lids and at a minimum you need a small medium and large of the best quality you can afford. Skimping on this will cost money in burnt food if the bases are too thin.

Add to this at least one Deep dish 10″ teflon coated frying pan with lid. This can be used to cook an amazing variety of foods and casseroles.

Square sided Cannisters for your staples always come in handy, they stack in the cupboard and keep out critters and you can see at a glance what you need when doing a shopping list. Alternately stack all of the baking ingredients into a tub to keep out the moisture and critters.

Spices need to be stored away from direct sunlight to maintain their flavour, you can use another tub to store these.

For Baking I recommend the following basics

  • Muffin pan
  • 8″ round cake pan
  • Teflon baking tray
  • 8″ Loaf pan
  • 2 x Baking sheets
  • 2 x wire racks to cool the cooked food or rest pans on when out of oven

Dont forget that you can add to this as you discover the need or have the money to expand with more toys.

Article Copyright Colleen Loader 2013


Leave a comment

Short Crust Pastry

Making pastry is one of the things that that has been known to make a good cook shiver in their shoes. For some, making a souffle can seem easier by comparison. However, it is easier than it might first seem. Here are a few tips and tricks to help you master it.

There are two main things that are key in making melt-in-the-mouth pastry.

  • The first is to use enough shortening (butter, fat, margarine); the fat used is called shortening because it shortens the protein strands in the flour (gluten) and makes the finished product melt in your mouth.
  • The second is to use a very light hand when mixing in the liquid and rolling it out.

I only roll pastry twice and then discard it. Oonce it becomes tough and stretchy when rolling, (springs back to smaller than what you rolled) the texture of the pastry is tough to eat when cooked.

With the 2 rules in place, here is my recipe for no sodium pastry.

ShortCrust-Pastry by Colleen Loader
Making the dough
I use a proportion of 2cups of General Purpose flour (plain flour) to 2 sticks (225g) unsalted butter.

Rub the butter through the flour until you get a consistency that will form a ball when squeezed lightly.

Make a well or hollow in the centre of the flour/butter mix

Add 2 eggs to give the pastry a rich golden colour – this also helps keep it together.

Then add 2 tablespoons of water (you may need to add more water – dependent on the humidity of the day)

REMEMBER I SAID TO HANDLE IT LIGHTLY
This starts with mixing the dough. Use a knife to stop from over-stretching the protein.

Keep mixing until the pastry forms a ball, this is where you add more water if need be. Too much water will make pastry tough, so be sparing with the water.

The pastry is ready when it has formed a ball. Test the water content by taking a small piece the size of a walnut, flatten in your hand and pull gently – it should break before being stretched more than ¼ inch or 1cm. If it does not stretch at all – add a bit more water.

Saving the pastry
Wrap in the finished pastry in a plastic bag and let the this sit for 30 mins before using. This rest allows the protein/gluten to relax for a short crust finish.

Basics that use short crust pastry
Now you are ready to make anything you wish that requires a good short crust pastry, including pie crust, pasties, quiche, cheese straws, samosas etcetera.

Sweet pastry
There is another method to use when making sweet short crust pastry. I will explore that in another post.

Tips
To roll pastry out when it is very short – use 2 pieces of plastic one on bottom and one on top. Roll to desired thickness then remove the top layer of plastic to roll onto rolling pin and then flip over onto dish or pie you are trying to use the pastry on. Then peel the bottom plastic off (which is now on top) Voila – no more broken pastry!

Recipe and photos copyright by Colleen Loader 2013


Leave a comment

How much is too much salt?

SaltShakerWe say there’s too much salt in prepared food, but how much is too much? For a person who has had a heart attack, a low salt diet is one where there is a maximum of 1500-2000mg of salt a day. For context, a teaspoon is about 2300mg of salt.

What surprised me most, I think, is that we thought we were eating healthy food. Organic soups (canned), vegetarian dishes from our favorite Thai, Indian, Chinese and Mexican restaurants were frequent visitors to our table, especially during busy weekdays. However, we’ve since realized that those delicious recipes had terrible loads of harmful salt in them. Canned chili was 920mg a serving, however, that was counted as 2 servings per can; a single can was 1840mg of salt. A jar of curry sauce says 400mg per serving, which sounds great until you read more closely, and realize the small jar has 6 or 8 servings per jar. Corn bread is 200mg a 2″ square, a slice of bread can be up to 400mg a slice, and a slice of pie between 200mg and 400mg depending on the number of servings you cut.

We have turned into much more careful readers. We examine every label to figure the amount of servings and divide to find the actual numbers per container. As we’re doing the math with the very real consideration of avoiding another heart attack, theres some pressure to pay attention. Very early we determined that a main meal can have a maximum of 500mg, and we would stay below the 1000mg as a total per day most days. That’s turned out to be a good thing, both for Raven (who had the heart attack) and for me (who has dropped a bunch of pounds water weight).

Salt retains water. Reducing salt, reduces water weight gain. The body does not have to work so hard to deal with the extra water. And the heart, which is a pump, needs to work less hard to pump that water around. Seems simple enough. In a person with a healthy heart, less water means more energy, and less weight.

What I’ve learned from this? There’s too much hidden salt in mystery food, so we’ll take the mystery out of it and cook our own food. Much of it will have no salt at all, and is “free food”, that is free from salt. To make it tasty, we add spices, balance the flavors and eat fresh fruits and vegetables in abundance. Baking our own goodies is a fun way to add love to the process.

I still have my artisan salts from the Murray River, Tibetan Pink, Salish Black and Hawaiian salts. I use them occasionally as a finishing touch for dishes, but only a few grains at a time. We’ve learned that we can have a little of anything we crave, and feel grateful that life and love continues to be rich and flavorful.

Article copyright Ria Loader 2013

Photo credit: mconnors from morguefile.com


3 Comments

Divine Date Loaf

Date Loaf

Date Loaf warm from the oven

We all have foods that invoke those halcyon days of our youth, warm comfort food that we ‘go to’ to make bad days better. Date loaf is one such food for my sister Ria, and in the past months all she wanted was some Date Loaf like we used to eat when we were kids. This recipe has been reverse engineered from memories of what it should taste like. When made using low sodium baking powder and sweet butter each slice averages 100mg sodium.

For the best results there are a couple of things to do first.

Date mix

Date mix

Step One: the flavour is better if you can soak the dates overnight in the water and molasses. If you dont have time  the day before – boil the water and pour over the chopped dates, place in freezer until cool (about 1 hour) use this time to do step 2.

Step Two: Sift General purpose (plain flour) with the low sodium baking powder 6 times using a large strainer or sieve.

Step Three: Preheat oven to 375F or 180C then grease and line the base of your loaf pans.

Mixing the cake

Butter,sugar,date loaf

Cream the butter and sugar with a fork, add eggs and stir till mixed

date, flour, date loaf

Add 1/3 date mix and sieved flour to butter/sugar/eggs, stir until a batter, continue to add dates & flour till all mixed in, stir 3mins for good measure

Cake Batter

pour finished batter into prepared loaf tins. Cook 25 – 45 mins till cake springs back when lightly touched

Ingredients: Measurements in imperial and (metric)

  • 3 cups General Purpose Flour (Plain)
  • 6 level teaspoons Low Sodium Baking Powder (less than 450mg/tsp)
  • 2 Sticks sweet butter (225gm unsalted butter)
    you cannot use margarine for this recipe as it

    contains too much salt
  • ½ cup Brown Sugar
  • ½ cup Date Sugar
  • 1/3 cup Molasses
  • 4 Eggs (large/70gms per egg)
  • 12 oz Chopped Dates (400gm)
  • Water (enough to cover dates in a measuring cup to 800ml total volume)

Photos and recipe copyright by Colleen (tummyluv) in Ria’s kitchen.